If you arrived here you already know something about Kubernetes or, you are trying to learn a little bit about it. This is a beginner practical guide where we will be learning some of the key concepts and creating our first cluster. Let’s get started:)
Kubernetes
Per the official documentation:
Kubernetes is a portable, extensible, open-source platform for managing containerized workloads and services, that facilitates both declarative configuration and automation.
So, in plain text Kubernetes, a.k.a k8s, is a container orchestration tool. To talk about a container orchestration tool, first, we need to know about containers.
Containers
At a high level, containers wrap code and it’s dependencies, so the application can run faster and reliably from one computing environment to another. This makes containers, a great choice for automation!
With containers, we are not installing software directly on the host operating system instead we are wrapping it in a self-contained package that has everything that the application needs to run.
There are some containers options out there, but the most used and with a great community is Docker.
Deploying Docker images to Heroku with CircleCI
So, is it not enough with containers? Why do we need an orchestration tool?
Well, with containers you can deploy the same piece of software on a cluster of several servers. This can help you with high availability and scale-up your app. But then a couple of questions arise:
- How do you manage the deployment of several containers to the cluster on software updates?
- How do you ensure that when a server goes down, a new server will be created with the same configuration and containers?
- How do you move containers around when one of the servers is running out of resources?
- How can we scale-up the cluster when we need to ramp up new servers to handle additional load?
And the list can continue growing. Of course, you can deal with a lot of these things manually, but a great deal of effort will be needed. It’s better to have our new best friend Kubernetes to take care of automating all our containers stuff and make it shine :)
Kubernetes cluster overview
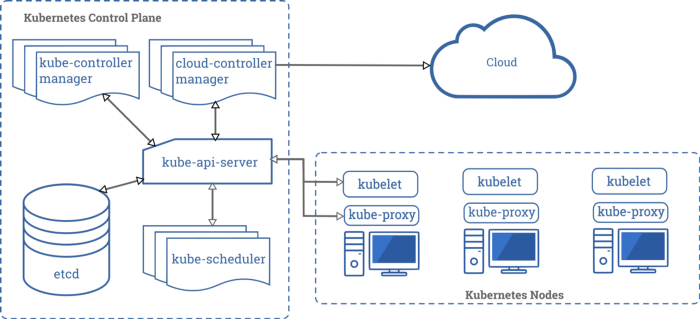
In the previous diagram, you can see all the components that are needed for a Kubernetes cluster, let’s briefly review some of them.
Kubernetes control plane components are the ones that make global decisions about the cluster, like responding when a node goes down, scheduling, pod replacement, etc.
etcd is the cluster database, is a consistent and highly-available key-value store. (metadata)
kube-scheduler is a component that is listening for newly created pods and distribute them on the different cluster nodes
kubelet is an agent that is verifying that every container is running in a pod
kube-proxy is the pods networking responsible. It maintains network rules between the nodes.
Nodes
A node is a worker machine in Kubernetes, it may be a VM or physical machine, depending on the cluster. (EC2 in AWS, Droplet in Digital Ocean) Each node contains the services necessary to run pods and is managed by the master components. The services on a node include the container runtime, kubelet and kube-proxy.
Controllers
Controllers in Kubernetes are the components that watch out for the state of the cluster, and then make or request changes when needed. Controllers are always adjusting the cluster to leave it in the desired state. For example, the Node Controller is responsible for noticing and responding when nodes go down.
Creating our first cluster
Let’s start by creating our first cluster. We will do that using Digital Ocean.
To follow along you can create a new account here. Note: this is a promotional link, so you will receive $100 USD for 60 days
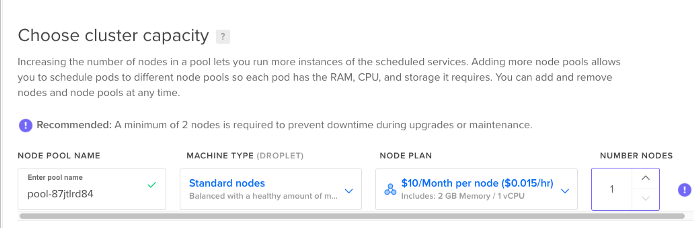
When you are done with your account setup, just go to manage -> Kubernetes and click on Create a Kubernetes Cluster. To start, we will choose the last version of Kubernetes, the default server location and the type of nodes to be Standard. We will start with a number of nodes of 1, we can scale it up later if needed. Then we just click on create cluster.
While the cluster is being created, it can take like 4 to 5 minutes, you can start installing the required management tools
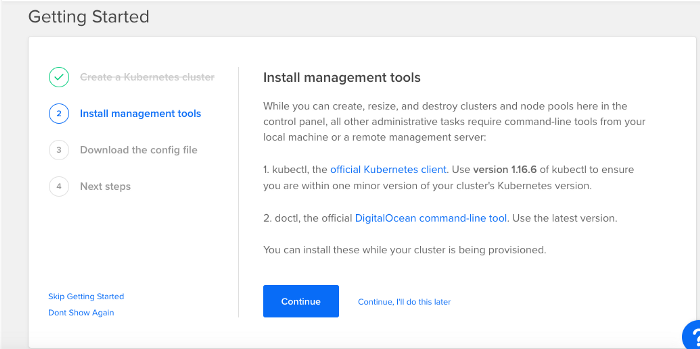
The first step would be to install kubectl in your local machine, if you are in mac we can use brew for that, in case you use another operating system you can check the guide here.
brew install kubectl
Next, we need to download the cluster configuration file.
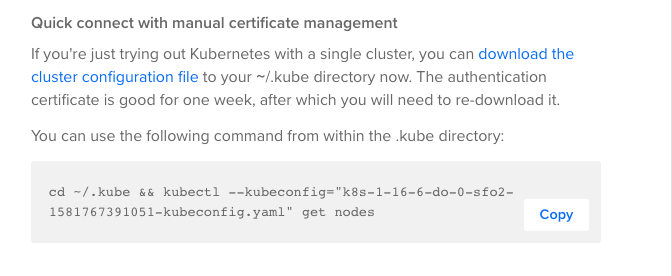
Instead of running the recommended script from Digital Ocean, we can move the file to our installation directory and set it as our current default configuration
mv /Users/{your_user}/Downloads/k8s-1–16–6-do-0-
sfo2–1581767391051-kubeconfig.yml /Users/{your_user}/.kube/config
Now when you run the get nodes command you should see the just created node
kubectl get nodes
NAME STATUS ROLES AGE VERSION
pool-87jtlrd84-dr1t Ready <none> 29m v1.16.6
One thing to note about Digital Ocean is that master nodes (where controllers, etcd, kube-api-server, etc are running) are fully managed by them at no cost, so the only cost you have is the worker node one.
At this point, we already have our cluster up and running and one worker node. Let’s create a new namespace to start deploying our code.
Namespaces
Namespaces provide scope for names. Names of resources need to be unique per namespace. Namespaces are usually used to create different environments like development, staging, production, etc, so resources get isolated per environment.
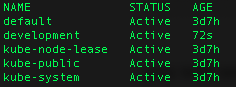
Let’s review the list of our current namespaces
kubectl get namespaces
To create our first development namespace we will need a YAML file like the following
%2011.54.46.png?width=1206&name=Captura%20de%20Pantalla%202021-06-15%20a%20la(s)%2011.54.46.png)
Then run the following command to create it in your Kubernetes cluster
kubectl apply -f dev-namespace.yml
If you do a
kubectl get namespaces
you will see your new namespace in the list. You can also use ns instead of namespaces in the previous command.
Pods
Pods are the smallest and more basic building block of the Kubernetes model.
A pod consists of one or more containers, storage resources and a unique IP address in the Kubernetes cluster network.
For our example project, we will be using a node.js API starter project that we have. You can clone the project from here.
Services
Services are another important component of Kubernetes. This usage motivation from the official documentation describes very clear why they exist:
Kubernetes Pods are mortal. They are born and when they die, they are not resurrected. If you use a Deployment to run your app, it can create and destroy Pods dynamically.
Each Pod gets its own IP address, however in a Deployment, the set of Pods running in one moment in time could be different from the set of Pods running that application a moment later.
This leads to a problem: if some set of Pods (call them “backends”) provides functionality to other Pods (call them “frontends”) inside your cluster, how do the frontends find out and keep track of which IP address to connect to, so that the frontend can use the backend part of the workload?
Let’s create our first service for our sample cluster, we will use the following YAML service descriptor:
%2015-10-59-png.png?width=1206&name=Captura%20de%20Pantalla%202021-06-15%20a%20la(s)%2015-10-59-png.png)
Apply it to the cluster with the following command:
kubectl -n development apply -f dev-service.yml
You can get information about the service, using the following command.
kubectl -n development get svc
A couple of things about the service we just created:
nodePort: Is the port that will be exposed at the node level to access the service
targetPort: Is the port that our container will be running
selector: Will be used for searching on all the Pods for the role api in this case and it will send the traffic to them
ReplicationController
One of our last steps in this example cluster setup will be to create a Replication Controller, that will be the one responsible to keep our Pod up and running.
%2015-12-15-png.png?width=1206&name=Captura%20de%20Pantalla%202021-06-15%20a%20la(s)%2015-12-15-png.png)
kubectl -n development apply -f dev-api-controller.yml
After this, we can run the following command to retrieve the pod we’ve just created
kubectl -n development get pods
Now we want to access the application we just deployed. To do that, we need to get the public IP of our worker node
kubectl get nodes -o wide

So, if we go to http://{yournodeip}:30000/ we will see our node.js starter project up and running. In case you want to access the swagger documentation of it, go to http://{yournodeapi}:30000/api-docs/

Before we end up here, let’s go back to one item of our list at the beginning of the article.
- How do you ensure that when a server goes down, a new server will be created with the same configuration and containers?
Let’s get a response to this question here. We can delete our created Pod as follows:
kubernetes $ kubectl -n development delete pod api-x9qn4
pod “api-x9qn4” deleted
kubernetes $ kubectl -n development get pods
NAME READY STATUS RESTARTS AGE
api-p9rsx 1/1 Running 0 9s
As you can see, as our Replication Controller was instructing Kubernetes to have 1 replica for this Pod, when we delete it, a new one was created automatically by Kubernetes.
Enjoy your new cluster :)