

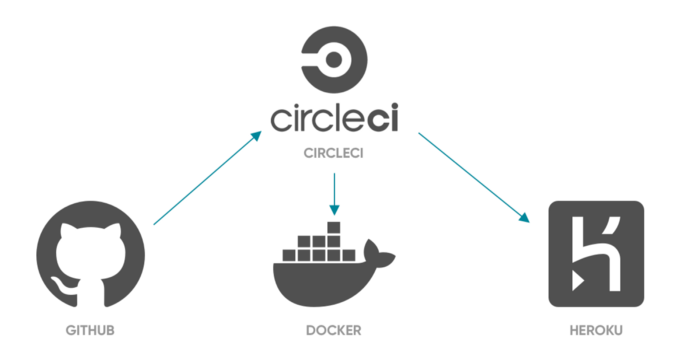
While the team was working on some proof of concept projects within the company, we needed to deploy those projects to a free cloud provider. During that time we were using AWS for most of our clients, but as these projects were going to be open-source seeds projects, we decided to deploy them on Heroku, which has a free plan and is widely adopted on the open-source community.

CircleCI
For all of our projects, we were using CircleCI to develop our CI/CD pipelines. CircleCI is a CI/CD cloud tool that allows us to build, test or deploy our code on every merge or commit, depending on how we configure it.
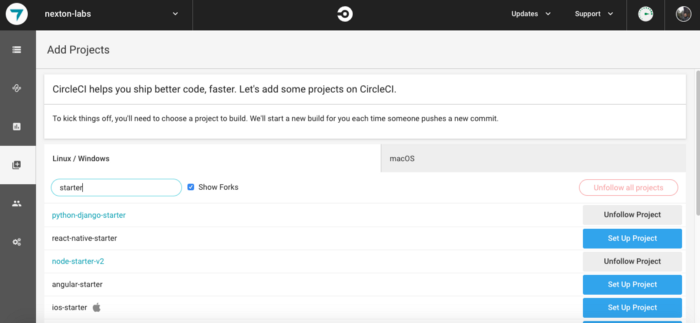
To start using this tool the process is pretty straightforward, you just need to sign in into the CircleCI site with your GitHub account, and that will detect your GitHub projects. After you are logged in, to start building one of your projects, just go to the Add Projects left tab and choose the project you want to start building.
That will take you to a new screen where you need to choose the technology of your project and it will give you an example of the config.yml file for that technology.
That file is the CircleCI configuration file that you need to add to your project to be able to be recognized by CircleCI. It needs to be located on a .circleci folder that should be created on your project root folder.
CI jobs and workflows
After CircleCI initial setup, we will need to start customizing our CircleCI config.yml to setup some build jobs and workflows.
Jobs
Jobs are a collection of Steps. All of the steps in the job are executed in a single unit which consumes a CircleCI container from your plan while it’s running.
After that definition from CircleCI documentation, find below a build job example for a Node.js app:
%2013.40.32.png?width=1206&name=Captura%20de%20Pantalla%202021-06-15%20a%20la(s)%2013.40.32.png)
Workflows
A workflow is a set of rules for defining a collection of jobs and their run order. Workflows support complex job orchestration using a simple set of configuration keys to help you resolve failures sooner.
And a workflow example:
%2013-41-58-png.png?width=1206&name=Captura%20de%20Pantalla%202021-06-15%20a%20la(s)%2013-41-58-png.png)
Heroku

After we have our application builds running, we would need to deploy the app to be able to see it online.
To deploy our Docker image from our development machine, we need to have Heroku CLI installed and the Docker daemon.
First, you will need to create the app in Heroku, using the Heroku web site. After that, you will need to login to Heroku from your terminal or cmd with the following command:
heroku loginAfter you run that command, a browser will be opened that takes you to the Heroku web site to authenticate. Once you are done, you will be back to your terminal, logged in.
Then, you will need to login to Heroku container registry:
heroku container:loginNo credentials will be asked at this time. Now, to build our docker image and push it to Heroku, run:
heroku container:push -a python-django-starter webYou need to have the Dockerfile in project root to be able to build the image. Finally, when the image was pushed successfully, you need to release it:
heroku container:release -a python-django-starter webAfter this last command runs successfully, you will be able to see your app up and running on Heroku.
Continuous Delivery?
So, previous steps will be deploying our app “manually” into our Heroku account.
But how do we automate this deployment pipeline, to throw a new version of our application every time we merge into a specific git branch? Is possible to automate Heroku CLI login without requiring a browser?
To accomplish all these goals, we will need to create a new job on CircleCI
%2013-42-11-png.png?width=1206&name=Captura%20de%20Pantalla%202021-06-15%20a%20la(s)%2013-42-11-png.png)
What these commands are doing on the Docker CircleCI build image is
- Install Heroku CLI on the build machine
sudo curl https://cli-assets.heroku.com/install.sh | sh- Login to Heroku registry passing our Heroku API Key as a parameter to don’t need to authenticate with the Heroku login command. (Bypassing browser login)
HEROKU_API_KEY=${HEROKU_TOKEN} heroku container:login- Building and pushing our docker image to Heroku registry
HEROKU_API_KEY=${HEROKU_TOKEN} heroku container:push -a python-django-starter webHow to Optimize Docker Images Using Dive
- Releasing the new version of our app
HEROKU_API_KEY=${HEROKU_TOKEN} heroku container:release -a python-django-starter webAnd that’s it, you will have a new version of your app on Heroku after this build run successfully.
But then, from where that HEROKU_TOKEN is being obtained?
HEROKU_TOKEN is an environment variable that is defined on CircleCI configuration. You need to go to your project settings, and there is a section where you can set your env variables for it. This env var is going to contain the Heroku API Key for our account, to be able to login to Heroku using the CLI.
To generate that API Key, you need to run the following command
heroku authorizations:createThat will retrieve a token, that is the one you need to use as your HEROKU_TOKEN variable.
And that’s it, at this point you will have a complete CI/CD pipeline that can be used to release your containerized application into Heroku using CircleCI as your CI/CD tool.